Installing Fiberglass Fenders and Bedsides: What Bolts On and What Gets Cut
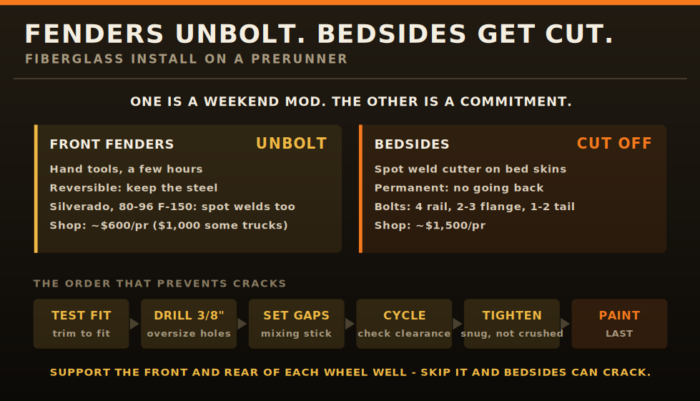
The short answer: front fiberglass fenders mostly unbolt and bolt on in an afternoon. Bedsides are a different job: the factory bed skins are spot-welded to the truck, so you drill them off — and that is permanent. Whichever you are fitting, three rules prevent most of the problems: drill the holes oversize, support the wheel wells, and paint last.
Fenders unbolt. Bedsides get cut off.
This is the decision to make before you order anything, and most build write-ups skip it.
- Front fenders on most trucks come off with hand tools — bolts along the hood line, behind the door, at the bumper and at the marker light. Keep the steel fenders and you can put the truck back to stock.
- Bedsides are not bolted on. Both ADV Fiberglass and McNeil Racing tell you to remove the factory bed skins with a spot weld cutter. Once they are off, they are not going back on.
- The exception: McNeil notes that Chevy Silverado and 1980–96 F-150 fenders are different — the outer fender is spot-welded to the inner, so you drill out the welds around the perimeter even at the front.
So front fenders are a reversible weekend mod. Bedsides are a commitment. If you are unsure about the truck’s future, do the fronts first and live with them.
Tools and materials
- Socket set, drill, and a 3/8" bit (ADV’s spec for the mounting holes)
- Flat and Phillips screwdrivers
- Spot weld cutter for bedsides — a drill-mounted cutter that removes the weld nugget without holing the panel behind it
- 120-grit paper for high spots, a carbide or diamond blade for trimming glass, and wide masking tape
- A wooden paint-mixing stick — the cheapest gap gauge you will ever own
- A respirator (N95 or better), goggles, gloves and long sleeves for any cutting or sanding. Fiberglass dust is not something to breathe or wear.
Installing front fenders, step by step
- Remove the steel fender. Take out the bolts under the hood, behind the door, around the door opening and behind the bumper, then the plastic liner and marker lights.
- Offer up the fiberglass and mark the holes against the original mounting points.
- Drill the holes oversize — 3/8". The extra room lets you slide the panel to get the gaps right. Fiberglass is not precision-stamped like factory steel, and McNeil notes parts sometimes need a little more trimming out of the mould.
- Bolt it on loosely. Snug, not tight.
- Set the gaps at the door and the hood using a mixing stick as a spacer, so both sides match. If the hood now sits wrong, adjust the rubber hood stops on the core support.
- Tighten — but do not overtighten. Expect some creaking as the glass seats; ADV warns it can sound like it is cracking and that this is normal. Actual cracks come from cranking it down.
- Refit the marker lights and anything else you removed.
Installing bedsides, step by step
- Remove the taillights and rear bumper. Pulling the bed off the truck is optional but makes the job far easier.
- Cut the factory bed skins off at the spot welds with the spot weld cutter, working around the perimeter.
- Hang the fiberglass bedside over the bed rail and align it using the cab’s body lines and the taillight opening as references. You may need to trim the inner bed or the glass to get it to sit.
- Drill oversize mounting holes and bolt it on in this pattern: 4 evenly spaced bolts along the inner bed rail, 2–3 along the front flange of the bed, and 1–2 around the taillight.
- Secure the front and rear of the wheel well. McNeil calls this the step that, done badly, leads to cracking. An unsupported wheel-well edge flexes every time the truck works, and that is where the glass splits.
Trimming fiberglass without wrecking it
Almost every install needs some trimming, either to fit the body or to clear the tire. Glass chips and delaminates if you treat it like sheet metal:
- Tape first. Lay wide masking tape over the cut line, mark on the tape, and cut through it — it holds the edge together and stops chipping.
- Use the right blade. Carbide, diamond or grit blades made for composites. A fine-toothed blade with no set cuts cleanly; an ordinary set-tooth blade chips the edge.
- Go slow with light pressure, and support the panel close to the cut so it does not vibrate.
- Finish the edge with a file or sandpaper, then seal it before paint.
Cycle the suspension before you commit
The whole reason for fiberglass is tire clearance, so prove it before the last bolt goes in. With the panels loosely mounted, cycle the suspension — or at least check it at full compression and full lock — and mark anywhere the tire touches. A tire that clears at ride height can still hit the glass at full stuff, which is exactly where your bump stops decide how far it travels. On a Tacoma, 4Runner or FJ the rub is often not the fender at all but the body mount — see cab mount chop.
Wider glass also means the factory plastic inner liner no longer covers the wheel well. Plan on new liners — shops sell them, or you can make them from rubber sheet.
Why fiberglass cracks — and how to stop it
- Overtightening. Glass has to be clamped, not crushed. Snug plus a little is enough.
- Holes drilled to bolt size. With no room to move, the panel takes every chassis flex as stress around the bolt.
- Unsupported wheel-well edges. McNeil singles out securing the front and rear of the wheel well as the bedside step that, done badly, leads to cracking.
- Tire contact. One hit at full compression can split a panel. Cycle it first.
Finishing: paint last
McNeil ships its off-road parts in white gel coat — not primed, not painted. The order that works: test-fit, trim, install, cycle the suspension, then paint. Paint first and every trim cut and adjustment ruins the finish. Before primer, lightly hand-sand the gel coat to knock down the shine so paint can bite. For the raw vs paint vs Line-X decision, see the fiberglass guide.
DIY or pay a shop?
Front fenders are a realistic DIY with hand tools — ADV describes the job as a few hand tools and a few hours. Bedsides are harder: welds to cut, alignment to get right on a panel that is permanently committed, and a real cost if you get it wrong.
For reference, McNeil Racing’s published install estimates are about $600 a pair for standard fenders ($1,000 for Bronco, F-150 and Silverado), about $1,500 a pair for bedsides, and about $400 a pair for wheel-well liners. Estimates as listed September 2026. To find a shop near you, use our fab shop directory.
Fiberglass fender install FAQ
Are fiberglass fenders a bolt-on install?
Front fenders usually are, apart from trimming and gap setting. Bedsides are not — the factory bed skins are spot-welded on and have to be drilled off. Silverado and 1980–96 F-150 fenders also need spot welds drilled out.
What size holes should I drill for fiberglass fenders?
Oversize. ADV specifies a 3/8" bit so the panel can be slid into position to set the gaps before you tighten it.
Should I paint fiberglass fenders before installing them?
No. Test-fit, trim and install first, then paint. Any trimming or adjustment after paint damages the finish.
Why did my fiberglass bedside crack?
Usually overtightened hardware, holes drilled to bolt size so the panel cannot move, or an unsupported wheel-well edge. Tire contact at full compression is the other common cause.
More fiberglass & clearance guides
- Prerunner fiberglass fenders & bedsides — the full guide
- ADV Fiberglass fenders & bedsides
- OBS Chevy fenders & fiberglass
- Cab mount chop for tire clearance
- Prerunner wheels & tires
Categorized in: Prerunner Builds